Tampilkan postingan dengan label build. Tampilkan semua postingan

Jumat, 25 Maret 2016

Boat Plans Aluminium Australia | High build primer

,

Boat Plans Aluminium Australia


The inside of the super structure was sand blasted, then received two coats of epoxy primer. The roof of the super  structure was sand  blasted, then received two coats of epoxy primer, followed by 2-4 coats of Acrylic Urethane. The roof of the super structure will eventually get a coat of some sort of non skid coating, but that wont happen until next year. The sides of the super structure is what Im working on now, and is what everyone will see and touch, got sand blasted, followed by two coats of epoxy primer, then three coats of high build epoxy primer. Once Im finished working on the high build, shell get another coat of epoxy primer to seal the high build, then three coats of top coat Acrylic Urethane.

The high build primer is another step I added to only the sides of the super structure. The purpose of the high build is only to help one achieve a nicer finish on the top coat paint. High build primer is able to be built up quickly to a thick layer, then is easily sanded back down. The easiest way to describe it is by calling it liquid body filler.

Just by the nature of the beast, building the super structure created many imperfections in the metal. Every place I welded a frame, or cleat  on the  inside, a bump in the metal was created on the outside. These small raised areas or "bumps, are called weld print through. If you run your hand over the metal, you feel the bumps. The print through will be extremely obvious on the  shiny final coat unless hidden. My method of dealing with it is to hit each spot lightly with the grinder before sand blasting to lower the bump below metal. The high build primer fills the now recessed area, and everything gets sanded smooth. The high build causes the print through to vanish.

All the welds on the super structure were ground flush, and the high build buries all the grinder marks and allows me to sand everything flush. Because the metal has been  laying around a long time, some rust developed, and after blasting the rust away, some pitting was evident. The high build fills 99% of those holes.

Once the high build  primer is sprayed on, I give it at least a day to cure before I start sanding. I use air tools for all my work. My preferred sander is a six inch dual action sander with a hook and loop pad that can accept a shop vac to eliminate the dust.  I first sand the panel using 220 grit, and sand any bad spots until I start seeing the under lying  epoxy primer. Once I have a panel sanded to 220, I go back over any questionable spots and add a bit of filler, the sand the filler to 220. Once Im happy with how things feel, I sand the whole panel to 400 grit. This sanding process takes some time, but its not hatefull, and goes rather quickly. The super structure is different than the hull in regard to  how its built and how it will look, so I dont feel as if I need to long board sand it to make me happy.  Once the panel is final sanded, and blown off with compressed air, is is now smooth enough that it  begins to show a reflection. I know things are going in the right direction when primer shows a reflection

As one is sanding with the 400 grit pad, the only way one can find imperfections is by feeling them with your hand. Eyes just arent good enough. The surface really is glass smooth, and any bump or ripple is easily felt by touch. The goal for me is to have a respectable looking paint job that will be easy to keep clean. While most areas seem insignificant, those small holes and marks will trap dirt, and ultimately speed up the demise of the paint. Because Im going to be the one whos eyes are going to be looking at things the most, I want it to work for me. As long as the surface is smooth and flat, buffing, polishing and waxing will work well in keeping the paint looking fresh for years to come. This could easily be a 15-20 year paint job.

High build primer is a porous coating and needs to be sealed with epoxy primer before the final coat of Acrylic Urethane is applied. The filler I am using also needs to be sealed, and there are some spots where I sanded to bare metal. There is no way around one more coat of epoxy primer, but thats a good thing and a small price to pay to make sure the job is done right. Once the last coat of epoxy primer is on the boat, I have 72 hours before the primer gets too hard and will not allow the top coat to chemically bond with the primer.  If I wait longer than 72 hours, Ill have to scuff to get a less than ideal connection between the top coat and the primer.

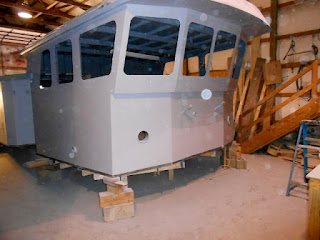
Its Sunday morning as I sit and type this entry, and the salon is ready for top coat. I still have to sand the wheel  house, but the trim, eyebrow, and all the difficult stuff has already been sanded and faired. The only thing left to be done on the wheel house is the flat panels, and that can be finished in four or five hours. Ill probably seal the super structure with primer early this week, and final coat the super structure by the middle of the week. I have one large area of "orange peel" I need to re paint on the hull, so I plan on sanding and painting this coming Saturday. As long as things go close to my planning, Ill have all the painting COMPLETELY FINISHED  by next weekend and Ill be able to  unwrap the hull and the super structure.

Cheers,


Do you find information about Boat Plans Aluminium Australia are you looking for? If not, below may help you find more information about the Boat Plans Aluminium Australia. Thank you for visiting, have a great day.
Read more

Rabu, 23 Maret 2016

Boat Plans Canada | Didi 950 Build Started

,

Boat Plans Canada


Michael Vermeersch of Ohio commissioned the Didi 950 design and has now started construction of his boat. He is building from a pre-cut plywood kit that was supplied by Chesapeake Light Craft in Annapolis. The kit arrived as 61 sheets of plywood with all components accurately cut by CNC router and packed on 2 pallets.

Michael reports that he is progressing well with the assembly of the backbone and bulkheads and that everything is fitting together beautifully. A few more bulkheads to go, then he will be ready to start setting up on the building stocks.

Michael with wife Pat & daughter Catherine.
Since adding this design to our stock design list, another three boats have been started. They are in Australia, Greece and Latvia.

The Didi 950 is drawn to the Class 950 Rule and detailed for building by the radius chine plywood construction method. It can be built from plans only or from a kit. Kits are currently available in USA but can be supplied by most of our international kit suppliers as well. Enquire with the supplier in your area and I will send the files to them for pricing. Note that for USA you must order from us, you cannot order it directly from Chesapeake Light Craft.

For our full range of designs, please visit http://dixdesign.com/.

Do you find information about Boat Plans Canada are you looking for? If not, below may help you find more information about the Boat Plans Canada. Thank you for visiting, have a great day.
Read more

Selasa, 22 Maret 2016

Boat Plans And Kits | Build a Model Sailboat !!

,

Boat Plans And Kits


The information used for the " Model Sail Boat Building, Making A Wooden Star45 R/C Sailing Model" includes posts found on the companion blog: The Star 45 R/C Model Sail Boat - Builders Journal


"Model Sail Boat Building, Making A Wooden Star45 R/C Sailing Model" is a start to finish, step by step, building manual. Including directions for covering a wooden star with fiberglass.

With the popularity of radio-controlled models, the number of people interested in owning a model yacht has also grown - in geometric range. As with model aircraft, the choice of sailing models runs the gamut from childs toy to sophisticated craft.

Over the past 30 years I have fielded many questions regarding the choices and considerations which go into selecting a radio-controlled sailboat.

Four questions are asked over and over by prospective skippers: How do the radio-controls work? How much do they cost? What do I look for when I buy mine? And, where can I get plans and instructions for building a sailing model?

The modern R/C model sailing craft is as different from a toy boat as a museum display model is from a childs tinker-toy creation. A model sailing craft operates with the same sophistication of design as any full-sized yacht

The AMYA STAR 45 Class discussion group is a terrific place to exchange ideas and talk about building Star 45 models for racing in AMYA regattas.

Feel free to contact me, Dave Mainwaring mainwaring @ rcn.com

Do you find information about Boat Plans And Kits are you looking for? If not, below may help you find more information about the Boat Plans And Kits. Thank you for visiting, have a great day.
Read more

Minggu, 20 Maret 2016

Yacht Boat Plans | Why Would Anyone Build a Boat

,

Yacht Boat Plans


Why would anyone build a boat? What kind of question is that for a boat designer to ask? I ask it because there are so many people who ask it in all seriousness. They ask it because they really cant understand why anybody would build a boat instead of buying one. There are so many boats out there that are available and can be acquired with so much less effort, new boats, good used boats, boats that have been damaged in weather events, tired boats that can be rejuvenated and almost dead boats that can be resuscitated.

There is no single answer to that question, there are many reasons why people build boats for themselves and each builder no doubt has a bunch of these reasons rolled up inside whatever it is that drives him to build his boat.

A reason that is common to all of the builders is passion. They have a passion to create a boat, to create something that would never have existed were it not for them and their desire to do this. Having been there myself many times, I can attest to the fantastic feelings that flood through when we first put that new boat into the water and then to give it life by hoisting sail or opening the throttle for the first time. If you think about how wonderful you felt when you first used a new boat that you had bought, doing the same in a boat that you have created with your own hands intensifies those feelings in ways that cant be described.
Petr Muzik built his Shearwater 39 then circumnavigated in his 70s.
It is that passion that also drives many of the decisions that are made during the build project. It drives them to do quality work because they want to feel pride in the final product. They want their creation to show well when seen by others, to be seen as a thing of beauty. Those who have never thought to build a boat themselves look at it and say "Wow, did you build that?".

Financial restraints are behind many amateur boatbuilding projects. If you need or want a new (as in not pre-owned) boat that costs double the money that you can afford to put into it, then the only route to get it is to build it yourself. I have never calculated ahead of my boatbuilding projects how much they are going to cost. Each time I have just dived right in and started, then kept going to the end. That was when I found out what the total cost was and was able to compare with what it would have cost me to buy an equivalent new pop-out production boat. Each time the cost of my fully-equipped boat was around 45% of the cost of a base-package for a production boat of similar size and concept.

Those who dont get it say "It cost you a lot more, you havent priced in your labour hours, which must be priced at your professional rate of pay". No, we dont price our labour into the project and no, we should not price it at the rate that we receive in our paying jobs, whatever they may be. The project serves as a hobby, as recreation that helps us to recover from a tough week working for someone else. It helps to keep us motivated and able to take on the world. The alternative of working very extended hours at our paying jobs to generate the funds to pay someone else to build our boat brings with it a risk of getting burned out in the process.
Andrew Morkel built his Argie 15. Now he and his family are learning to sail in it.
Many people who build big boats for long distance cruising want to build it themselves to give them confidence in the strength of the boat. They know that they will be sailing their boat on very remote waters, far from rescue services and possibly with their beloved family aboard. The safety of all depends on the quality of the build and they dont want to leave that to people whom they dont know. They have vested interest in doing everything in the best manner possible, so they want to do it themselves. In the process they garner the side benefit of knowing intimately how the boat works, where all of the important parts are, how to get to every seacock or filter in a hurry when dictated by some emergency that may develop onboard. They know exactly how to repair everything onboard because they installed it in the first place. They are likely to lay out all aspects in a very sensible and logical manner because they will have to maintain it themselves. At sea in a storm is not the best time to be trying to track down plumbing or electrical faults in systems that are overly obscure because the person who installed them before the hull liners or lockers were installed didnt consider the problems of working on them in the completed boat.

Others build their own boats because they want something different,  a boat that will stand out from the crowd on marinas, at sea and in distant anchorages. They add personal styling features to fit their own characters and they choose joinery detailing such as is not available from production boatbuilders.
Sergey Federov built his Hout Bay 33 to a very high standard.
Some people choose to build a boat purely for the hobby benefit. They enjoy the build more than using the boat, so the project will be drawn out interminably. They produce exceptional quality in the process but will probably sell the boat when completed or soon after.

It has been said many times that the happiest days of a boatowners life are when he buys and when he sells the boat. The exception to that cliche is the boatowner who has built his boat himself. There is so much of the builder wrapped up in that boat, in the form of blood, sweat and tears, to say nothing of chunks of skin and body hair, that he and the boat have an affinity and  intimacy that is unknown to those who buy their boats. I have felt very sad when selling each of the boats that I have built, far from the happiest days of my life.

It has also been said many times that boatbuilding is a disease and when you have had it, you will experience periodic relapses. I have to agree with this one, I have had numerous relapses. I cant say that I have suffered relapses, as would apply to most diseases, I have enjoyed those relapses too much to convince my wife that I have suffered in any way. And this is the way that most amateur boatbuilders feel. Visit any of the many boat shows that cater for amateur boatbuilders and you will see for yourself how much they love what they do and just how much passion they build into their projects.

To see our range of designs, for amateur or professional boatbuilding, please go to http://dixdesign.com.

Do you find information about Yacht Boat Plans are you looking for? If not, below may help you find more information about the Yacht Boat Plans. Thank you for visiting, have a great day.
Read more

Jumat, 18 Maret 2016

Boat Plans Nz | Thomass Hayes new Flats skiff build

,

Boat Plans Nz


Thomas Hayes is a fourth generation boat builder from Florida. He has been working in the Fiberglass production boat building business for 18 years working in all phases of the fiberglass production of boats as a hands on builder to supervisor. He knows his trade very well. 
I have had the pleasure of corresponding with him over this past year answering questions and giving my opinions and some advice on his personal project. 
He started out just wanting to design and build his own skiff for himself and then two more for family. This project has grown from just a hull mold to now a finished complete skiff with all molds ready for production of many more.
Following are some pictures Thomas has been sending me of his skiff in progress.
He has not launched his skiff as I write this blog but it will soon be in the water.
Lots of new ideas being used here in his skiff. Look closely... As I feel lots of these ideas will be finding their way to Others new designs.


Heres his unnamed new skiff just pulled from the mold. For the underbody pictures go back and look at my old blogs about new skiffs. This looks to be the driest running skiff out there. Cant wait to see her running.


Huge bow spray rail and lots of underwater spray defectors.


Look at that bow over hang. This skiff will weigh around 600-700 lbs when finished. Its a nice big skiff.


Heres the deck with all the hatches installed. No hinges on deck!!! All his hinges are hidden with his unique hinge system. Its very simple when seen.


 Bow hatch finished.


Bow hatch details revealed. How cool is this?


His moldings are as good as they get.


His deck mold has no hatches molded into it. This means that he can move his separate hatch molds where ever he or the clients want them. Look next to see how this works.


Because of his perfect moldings he just puts the finished part on the deck mold. He then gelcoats the deck around this part and when it cures this part is then glassed in as part of the deck. When its all pulled out of the mold all he has to do is just trim and slightly buff in the transition edge of these two parts. To me this is brilliant. Saves having to make so many deck molds. Now you can have more shop space.


All hatch tooling parts in place here ready for the deck gelcoat and then glass work.


Now the deck is attached. The clear glass in the bulkhead is the side of the fish live well or bait well depending on what youre up to. This detail he saw in an old Cabo Boat and has carried it into his skiff.


Wont that be fun to look at when its full of bait night fishing? The black ring is the drain.


The not so fun side if youre the bait or the fish caught looking out into the cockpit. Look at the details and finish throughout. Top of the line. 


Skiff going together.


Console being finished. Now look.


Console details. Look at what goes here.

Removable cooler box. 

Thomas says he has been influenced by early Hells Bay and Gordon Skiffs having owned an 18 Waterman and a Glades skiff. 
He has put lots of effort and money into this project that has taken him a year of part time work. At present he says he has almost the same amount of $ in his first finished skiff here and all molds as a new store bought skiff bare hull. 
But he now has the molds to build the next two that his family members want and then he will have to see if he wants to get in the market to build more for others.
Wait and see how this skiff performs. It might be the next " ONE" for you.
Thomas will always be able to say " Yes its my own design and build" with pride.
Theres nothing like being in a boat you built yourself.
Well done Thomas and good building to you a master craftsman.


Do you find information about Boat Plans Nz are you looking for? If not, below may help you find more information about the Boat Plans Nz. Thank you for visiting, have a great day.
Read more

Rabu, 16 Maret 2016

Dinghy Boat Plans | More on Stability with Water Ballast

,

Dinghy Boat Plans


John Gilbert asked a question in response to my recent post, Stability with Water Ballast.

I do not get why the red and blue curves do not meet up at 180 degrees. Inverted the boat has no windward side as you point out, so you have water ballast on one side and none on the other side. As you have drawn the curves you have powerful stability in the  inverted position with the water on one side (red), but actually a righting moment if you have water on the other side(blue). What is the difference?

To help with understanding this I thought it better to write a new post that expands on the dynamics of stability than to try to answer it in the comments section after that post.

This will be more easily understood by seeing a diagram showing the stability graph expanded through a full 360 degrees rather than all conditions overlaid on top of each other in a 0-180 degree range. This is exactly the same stability info for the Didi 950 as shown in the graph of my earlier post but shown in a different manner.
Diagram of Stability through 360 Degrees
I will start with the green curve. This shows the stability without water ballast. The centre of gravity (CG) is on centreline. The stability curve intersects with the horizontal grid line at 0 degrees heel and increases identically both to left and right of the 0 degree line, so the boat will float without any heel to either side when right way up. The boat will stay that way in the absence of any wind, wave action or crew movement on the boat.

Follow the green curve until it comes down past 130 degrees to again intersect with the horizontal line at the Angle of Vanishing Stability (AVS). Then it enters a range of negative stability where it will proceed toward upside-down. At 170 degrees it crosses to above the horizontal line again. This indicates that the superstructure volume is trying to turn it back upright and doesnt want the boat to lie totally inverted. It will easily flop back and forth between the 170 and 190 degree points. The boat can return to upright along either green curve.

This all depends on a totally waterproof superstructure, of course. In practice water is likely to enter the boat at a rate that depends on what is open at the time, which will affect the inverted stability. 

Moving on to the stability with water ballast, in my earlier post I said that the boat will capsize along the red curve and recover along the blue curve. I explained the relationship between the two curves but that relationship is not easy to visualise if only seen across the 180 degree range.

In the diagram above you can see that the red and blue curves only meet in two places and both are on the horizontal line. These are the two points at which the boat will rest when there are no outside influences from wind, waves or crew movement.

The boat cannot rest totally upright nor totally upside-down because the weight of the water to one side is heeling it toward that side. It will rest at approximately -5 degrees heel instead of upright and at 200 degrees instead of upside-down when inverted.

Bearing in mind that the areas of the curves below the horizontal line indicate how much energy it needs for the boat to get past the AVS points so that it can right itself when in that 200 degree situation, it is now easy to see that it will take a large amount of wave energy to get past the AVS of the red curve but a very small amount of wave action to get past the AVS of the blue curve.

This graphic shows that if a water ballasted boat capsizes it will do so along the red curve but it is very unlikely to return along that same path, nor is it likely to stay capsized for long. Once past the AVS of the red curve the negative stability will push it to 20 degrees past upside-down. After that the blue curve will take over and almost guarantee that the boat returns to right-way-up pronto.

Do you find information about Dinghy Boat Plans are you looking for? If not, below may help you find more information about the Dinghy Boat Plans. Thank you for visiting, have a great day.
Read more

Senin, 14 Maret 2016

Boat Plans For A Chesapeake Deadrise | Short cutting the Boatbuilding Process

,

Boat Plans For A Chesapeake Deadrise


Many people want to build a boat for themselves. Some are like me and just dive into a project, believing that we can learn how to do it properly during the process. Others are more cautious and will investigate everything about the process before taking the step of cutting the first piece of wood. Some of them will never even make that first cut, unconvinced that they will be able to complete the project.

Most boatbuilding projects that are started do get completed but there are others that the original builder is not able to complete for one reason or another. This may be for any of a number of reasons, from financial problems to illness in the family or even death of the builder.

These partially completed boats are an opportunity for those potential builders who dont have the confidence to take a project from that first cut through to launching the completed boat. If bought by someone else, such an incomplete project can knock the major part off the timescale needed for completion.
Didi 34 waiting for a new owner to complete her
 We recently sold a semi-completed project for a Dix 43 Pilot that was available in South Africa. The new owner is now completing the project to take him and his family cruising distant waters.

We have other semi-completed projects listed on our brokerage pages that wait for new owners to complete them. Listings that we have at present are for plywood Didi 26 and Didi 34 and an aluminium Dix 38 Pilot.

The Didi 34 project is particularly worthy of consideration. It became available after the builder succumbed to cancer. His wife needs to sell it and has reduced the price to a level that makes it a very viable project to get a speedy cruiser/racer afloat in a fairly short time and at low cost.

So, if you are interested in building a boat for yourself but want a head-start on the project, have a look at the semi-completed projects on our brokerage pages.

Do you find information about Boat Plans For A Chesapeake Deadrise are you looking for? If not, below may help you find more information about the Boat Plans For A Chesapeake Deadrise. Thank you for visiting, have a great day.
Read more

Minggu, 13 Maret 2016

Boat Plans Arch Davis | Didi Sport 15 DS15 Launch

,

Boat Plans Arch Davis


The long-awaited day arrived this weekend. Jim Foot, in Port Elizabeth, South Africa, launched his self-built DS15 at Algoa Bay Yacht Club. He started with a pre-cut plywood kit supplied by CKD Boats in Cape Town and took approximately 6 months of his spare time from start to launch.
DS15 "Bateleur" about to get wet for the first time.
 Despite the very light wind, they had good sailing and were impressed by performance. Jims first comments are:-

She sails beautifully and she is fast. Beating into a chop in light wind this am going at about 3,7 kts felt happy. Then was told wind spd 4 kts by passing boat quite amazing.
Very well behaved. No balance issues. Save a bit of lee helm with the kite up. Loads of compliments from older sailors. Hunter Gall get on the water you dont know what you are missing. This is one good boat. Ps only sailed in bulb config at this stage.
A few changes to make. But not many. Congrats Dudley on a fantastic hull. Its a beaut.

Ready for sails and rarin to go.
Rigging the sails. Clean deck layout and large cockpit.
Jims friend Mark Dawson was with him for the first sail and passed these comments:-

Lucky enough to be the first to sail this boat with James Norman Foot. What a beaut! After a hairy moment of rocking the boat to moorings, which became a desperate paddle when we started drifting towards the rocks, we rigged the sails and immediately accelerated away. Bateleur likes to sit flat and notably accelerate in the lightest of wind puffs. A forced capsized showed how stable she is and how literally effortless to bring her back. Sailing the Didi 15, I just want to go again. Cant wait to see her in stronger breeze. In summary...I need one.
"Bateleur" returning to ABYC with a very happy crew.
Jim will keep us up to date with his testing and fine-tuning over the next few weeks. I hope that we will also get to see some photos and videos in stronger winds as Jim and "Bateleur" grow to know each other.


The top photo of this post shows the hull shape very nicely. For those who have not followed my posts about the build, this is a plywood boat although it doesnt look like one. It is the smallest in our radius chine plywood Didi design range. The hull is the same family as the Didi Mini Mk3 and Didi 950, with topside chine above a radius chine underbody.

It can be built from plans only, plans and patterns or plans and a CNC kit. See more info about all of our designs on our website at http://dixdesign.com/


Do you find information about Boat Plans Arch Davis are you looking for? If not, below may help you find more information about the Boat Plans Arch Davis. Thank you for visiting, have a great day.
Read more

Dinghy Boat Plans | Hull Turning Methods

,

Dinghy Boat Plans


I have shown a few projects in this blog over the past few months with the hulls being turned using different methods. The bigger the boat the more critical this operation is. The risks of damage to property and injury to people increase exponentially as the boat becomes more bulky and increases in weight. Imagine the difference between turning over a plywood hull that is 6.4m (21ft) long, 2.4m (710") wide, 1.2mm (311") deep and weighing 200kg (440lb) or a 50% scaled up version of the same hull. At 9.6m (316") long, 3.6m (1110") beam and 1.8m (511") deep, it will weigh 675kg (1488lb).

It has only increased 50% in all directions but the weight is more than 3x that of the smaller boat. The bulk becomes more difficult to manage and the weight to lift and lower becomes a major factor. If, at the same time as increasing the size, you also change to steel as the construction material, that same size hull could weigh 2500-2750kg (5500-6000lb). Now you are talking about some serious loads that can get out of control, yet the boat is still only 50% bigger in each direction.

Those smaller projects are easily turned over by hand, with friends and neighbours supplying the motive power and the boat having a soft landing on tyres or some other cushioning material. Years ago a client of mine in South Africa turned his 32ft hull by himself. He jacked it up on one side until it reached the balance point, then let gravity take it the rest of the way. It fell against a young tree, then slid down the tree and came to rest flat on the ground. Luckily his hull was relatively undamaged but the tree didnt survive the experience.

There are many ways to turn a hull but that is not one of them. I have a whole chapter on this subject in my book "Shaped by Wind and Wave", to give guidance on how to safely turn your hull. The two Didi 950 hulls that were turned recently in USA and Australia both used the spit-roast method. For each of my own big boats I have used a chain block to do the work, another of the methods explained in the book.
Turning the 38ft "Black Cat" using a chain block on a scaffold tower.
The book can be ordered either as a paperback or as digital for reading on whatever screen device suits you.

To see our range of designs, go to http://dixdesign.com/.

Do you find information about Dinghy Boat Plans are you looking for? If not, below may help you find more information about the Dinghy Boat Plans. Thank you for visiting, have a great day.
Read more

Jumat, 11 Maret 2016

Boat Plans Canada | South Atlantic Capsize

,

Boat Plans Canada


Most of you will have read here or elsewhere about our adventure in the 2014 Cape to Rio Race on the Didi 38 "Black Cat". I have published a book about it, which can now be ordered from our website. For those who dont know what happened, here is a synopsis of the book, which is titled "South Atlantic Capsize - Lessons Taught by a Big Ocean Wave".

At dusk on 5th January 2014, the Didi 38 "Black Cat" was struck by a massive wave on the second day of the 2014 Cape to Rio Race across the South Atlantic Ocean. The wave capsized her in an instant, flinging crew, equipment and food around the interior and destroying most of the electronics with water that entered through the companion hatch. "Black Cat" recovered very quickly but the electrical damage was done. This is the story about the race, the boat, the crew and what happened on that day.
Front cover of the new book
It also explains the principles of stability that control the safety of monohull sailboats, mostly those characteristics that affect the behaviour of boats in large beam seas that might capsize them and the features needed to quickly return them to upright. It does this in words and terms that can be easily understood by non-technical people.
Back cover.
You will also read the story of the capsize of the 64ft "Sayula II" in the Southern Ocean when sailing between Cape Town and Sydney in the 1973 Whitbread Round the World Race, written by yacht designer Butch Dalrymple-Smith, who was one of the crew. Also what one boat owner has added to his own boat to prepare it and himself in case they are caught by conditions that place them at risk of capsize.

I managed to coerce two of the crew to also put pen to paper, to each write a short piece about his experience. I felt this to be important because we all observe events from our particular points of observation and positions in life. My view from the inverted cabin roof of Sean Collins hanging on for his life in the cockpit and of Adrian Pearson flying like a rag doll around the cabin is very different from that of Sean looking down the steep slope of a monster wave and seeing the masthead spearing into the ocean below, knowing that the boat will follow deck-first.  I would have liked to have had stories from the other two crew as well but they did not feel capable of effectively putting their stories into words.

You can buy the book at http://dixdesign.com/articles.htm. We can ship to you wherever you are, at our normal shipping rates.

To view our range of boat designs, please visit http://dixdesign.com/


Do you find information about Boat Plans Canada are you looking for? If not, below may help you find more information about the Boat Plans Canada. Thank you for visiting, have a great day.
Read more

Yacht Boat Plans | Didi 950 Build Bottom Skin Panels

,

Yacht Boat Plans


Mike Vermeerschs amateur boatbuilding project of a Didi 950 is moving on to the next stage, with bottom panels fitted and work starting on the side panels. Mike is building from a plywood kit that we supplied to him and reports that the fit is good. The kit has jigsaw joints on all large panels, making them easy to assemble either on the floor or on the boat.
Didi 950 with all stringers installed.
Two of the stringers each side, at the junctions between flat and radiused skin areas, have plywood doublers attached to serve as backing pads to the joint. I call these the tangent stringers. The doubler on the upper tangent stringer is in process of being fitted and can be seen running forward from the transom through to the third bulkhead from aft.

In the photo below, the transom has been fitted, followed by the bottom panels. These panels each have two transverse jigsaw joints and join each other at a centreline butt joint over the plywood backbone. In the photo the jigsaw joints have temporary battens over them to secure them while the glue is setting.
Bottom panels fitted.
Mike has also started to dry-fit the side panels ahead of gluing in place. At the right of the photo the forward lower panel can be seen and which will continue through to the transom. The lower edge, as seen upside-down like this, forms one half of the chine. The other half of the chine will be formed by the upper side panel.

Today Mikes 300lb brother decided to test the hull stiffness of this partially-built Didi 950 . He climbed onto the bottom of the boat and jumped on the bottom panels. They passed his improvised test but I think that I would have recommended that he wait until the whole hull was skinned before doing such a test.
Mikes 300lb brother tests the Didi 950 hull stiffness.
The broad stringer that shows on this photo is the upper tangent that will join the lower side panel to the radius.

To see our other designs, visit http://dixdesign.com/ .


Do you find information about Yacht Boat Plans are you looking for? If not, below may help you find more information about the Yacht Boat Plans. Thank you for visiting, have a great day.
Read more

Kamis, 10 Maret 2016

Boat Plans Uk | Rachel Platt Morejohn my other half

,

Boat Plans Uk


I have been around for awhile. I talk a lot here on this blog about what I have been up to in designs, boat work and our sailing life. I want to share some pictures of my wife Rachel from this past year of adventuring. I would never have accomplished what I have to date if not for her being by my side literally or backing me up back home when Iam off single handing. We have been together for over 26 years now. I wake up every day looking forward to what she has to say. 


Rachel trying the paddle board out in front of our place in the Bahamas


Rachel posing in front of our yacht in Antigua. The Hogfish is anchored behind all these other yachts.


Rachel with her first cup of tea in the morning


Now Iam ready to hear about what she dreamed about last night or whats on her mind. Its breakfast time on Hogfish.


The two of us after running a 5 mile Hash in Antigua.


Me stalking Rachel in Martinique 


Having lunch in Tyrell bay in Carriacou 


St. Barts 


Looking for beach treasures a few days ago


Racing Wild Bird off of Nevis


Passing by a Smurff boat in Grenada yesterday.


Trying on a huge piece of sea glass a few days ago.


The two of us on Hogfish celebrating Rachels 50 again birthday back in March.


The truth is I dont know what I would do without her. 


Do you find information about Boat Plans Uk are you looking for? If not, below may help you find more information about the Boat Plans Uk. Thank you for visiting, have a great day.
Read more
 

Boat Plans For A Chesapeake Deadrise Copyright © 2016 -- Powered by Blogger