Tampilkan postingan dengan label on. Tampilkan semua postingan

Jumat, 25 Maret 2016

Boat Plans Pdf | Beautiful Shearwater 45 Available

,

Boat Plans Pdf


The Shearwaters are boats of which I feel proud. They are very pretty, they are capable in all weather conditions and they are fast. The Shearwater 39 has an enviable reputation as one of the most seaworthy designs ever to come out of South Africa, a country that is known to have some of the most severe sailing waters in the world. These boats turn heads wherever they go, partly because they are so pretty and partly because they sail past many boats that look faster.

Shearwater 39 "Shoestring III" on launch day.
The Shearwater 45 grew naturally out of the reputation that was earned by the 39 and was developed out of the moulds of the 39. It has more length with no freeboard increase and with very little extra beam. The resulting boat is very sleek and gracious to look at and it gained a surprising boost of speed that allows it to outsail most boats of equal size and many that are up to 25% longer. In gaining that speed it has lost nothing of the seaworthy characteristics of the smaller sister. What it did gain is greater responsiveness and fingertip steering due to the change from a semi-balanced transom-hung rudder to a balanced spade rudder.

Shearwater 45 sailing on Chesapeake Bay.
We have good examples of both of these designs available on our brokerage pages. The most recent to come available is the gorgeous 45 "Maggy May". She is lying in the Caribbean and is fully equipped, maintained in top condition and ready to cruise to anywhere that you care to go. She is only being sold due to serious illness of the owner. To view "Maggy May" and the other Shearwaters that we have listed, go to http://dixdesign.com/brokerdd.htm.

Please visit our website at http://dixdesign.com/.

Do you find information about Boat Plans Pdf are you looking for? If not, below may help you find more information about the Boat Plans Pdf. Thank you for visiting, have a great day.
Read more

Boat Plans And Patterns | Lester Gilbert on Boat weight and Boat speed

,

Boat Plans And Patterns


Model Boat journal

Lester Gilbert on Boat weight and Boat speed
I was wondering whether it really mattered if a yacht was a little overweight. Ive taken the "Acceleration" page spreadsheet and produced a whole new version. It calculates drag and acceleration against a time line, rather than against a speed line (spreadsheet here, approx 96 kb), in order to yield relatively stable calculations. More importantly, it now factors in the yacht displacement in order to calculate acceleration, and calculates the distance travelled during acceleration. For a given wind speed and displacement, the sorts of results it gives are shown below, plotting speed and distance against time while reaching and while running. These particular graphs are for a wind speed of around "1", showing the yacht reaches maximum reaching speed after about "6" units of time. These are arbitrary units, because the spreadsheet is not calibrated. However, if you think "1 metre per second" for the wind speed, and "6 seconds" for the time, youll not be too far out.

http://www.onemetre.net/Build/Accel/Accel2.htm


Do you find information about Boat Plans And Patterns are you looking for? If not, below may help you find more information about the Boat Plans And Patterns. Thank you for visiting, have a great day.
Read more

Kamis, 24 Maret 2016

Boat Plans Stitch And Glue | Update on OkoumeFest

,

Boat Plans Stitch And Glue


It was a very long day but well worth the effort. We left home at 4am, arrived at the venue by 9am and had the first boat sailing by about 10:30. The two Paper Jets attracted a lot of attention and more people sailed my boat in one day than have sailed her in 6 years. Those who sailed her seemed very impressed, despite the generally light breezes and lumpy water. The lump was generated by wind elsewhere on the bay that wasnt reaching us.

Two Paper Jets nested for towing.
Paper Jet #007 rigged and ready to go.
Two happy sailors return to the beach.
 We finished the day with a visit from South Africans Terry and Greg Clarens, ex Durban but now based in Annapolis. They took the two boats out on the late afternoon breeze with flat water and possibly had the best sailing of the day.

A few people commented about the beautiful detailing and woodwork of the two boats. They have on occasion been described as works of art or sculptures. This was part of the overall design concept and is one of the aspects that make these boats so eye-catching. My aim was to create detailing that would encourage builders to be proud of their work and to strive for a higher standard. Despite being thoroughly modern in shape, the rig details include features more normally found on traditional gaff-rigged craft. These include lashings, soft-eyes and birdsmouth wooden spars that are oh so pretty.

Thanks to all who came to CLC OkoumeFest and particularly those who test-sailed our boats.

To see our full range of designs, go to http://dixdesign.com


Do you find information about Boat Plans Stitch And Glue are you looking for? If not, below may help you find more information about the Boat Plans Stitch And Glue. Thank you for visiting, have a great day.
Read more

Rabu, 23 Maret 2016

Boat Plans Aluminium Australia | Back to work on the boat

,

Boat Plans Aluminium Australia


Its been a while since Ive made a post but Im happy to say that Im back to working on the boat. Life seems to get in the way of things we want to do, and Ive recently had a run in with just such an episode. Getting the house ready for winter, a short lived uptick in my business ( business is still way down and dropping), pulling the Caver boat out of the water and winterizing, cutting firewood for the shop and house, blah, blah, blah. I"ll quit bitching now, but Im sure all who might read this will be able to relate.

The next job at hand on Conalls big boat build is to finish getting ready for the insulator to do his thing. I need to finish painting the engine room witch is turning into quite a bit of unfinished business. My list of what needs to be done in the engine room is as follows:

- Install the generator and weld in all the fittings for the water lift exhaust system.
- Weld close the generator access hole.
- Install ac and dc electric conduits and various junction boxes and fixture boxes.
- Install the center baffle on the exhaust/intake trunk
- Re-prime the engine room with etching primer, then top coat with Alkyd Enamel
- Install all the wood firing.

This is the abbreviated version of my list as I still have ac and dc conduit work to do in the master stateroom, forward cabin, and head. All in all I would have to guess that Ill have a solid month worth of work to get her to the point of being ready to insulate.

I"ll start to post some pictures as I move forward. Ive found that this boat building thing seems to go a little easier if I break the "big boat build" down into about 80,000 smaller jobs that make up the "big boat build". I might continue this post and add to it as I mover forward, or Ill post a separate entry for each of the micro jobs I get finished.

Conall

Do you find information about Boat Plans Aluminium Australia are you looking for? If not, below may help you find more information about the Boat Plans Aluminium Australia. Thank you for visiting, have a great day.
Read more

Boat Blind Plans | Daves musings about setting up and adjusting sails on R C model Boat

,

Boat Blind Plans


Dry sailing -set up.

Place the model in a stand. Head the model into them wind.

Things that can be moved, and adjusted: Mast step. Mast rake. Boom vangs. Shrouds. stays. Jumper stays. Head stay/jib stay. Sail shape - loose foot. out-hauls.

Attach the sails to the mast.

Set the sail winches in fully trimmed position while allowing sheets to be slack.

Stand the mast with standing rigging attached in the center step position.

Hook the jib swivel into the middle slot of the jib rack. {The jib boom needs to clear the mast.}

Connect the side stays to the chain plates and adjust so the mast is straight and vertical.

Connect the back stay to the back stay fitting.
The jib stay and back stay will need adjusting to set the mast in vertical position.

Move the out-haul of the sails along the boom to give the sails to have some "belly". Pulling the sails out along the boom flattens their shape. The belly (or shape) of the sails will be determined later and the sail shape will be determined by how windy it is.

Where you attach the sheets to the booms will take into account the type and adjustments available for the sail control. The booms should be full out (90 degrees to the center line of the hull) when the SCU is full out and then the booms should be just about over the center line when fully trimmed in. ( I see 10 degrees as suggested angle to center line). The length of jib sheet trimmed and the length of main sheet trimmed is a factor in setting up the sail control so the sails are coordinated properly when sailing. The SCU handles a much longer main sheet than the jib sheet. The use of jib traveler and mainsheet traveler can help position the sails when fully trimmed in. Unless two servos (SCUs) are used a single SCU has the task of coordinating the positioning of the jib and main.

Turn on the R/C and run the SCU.
Test out SCU setting with the sails full out and fully trimmed.

With the mast set up and sails adjusted roughly in position it time to launch and sail.
--
Setting Sail on the water.

Before launching TURN on the radio on the boat. I have seen many models set loose to sail with the on board receiver and sail controls not tuned on and very unhappy skippers watching as their model sails away towards the horizon.

The initial rigging and sail settings are based in getting the model to sail a strait line while close hauled (sails trimmed in) and sailing up-wind.

Properly trimmed the rig will allow the model to sail it self in a straight line with just a minor tendency to "round-up" (i.e. sail itself dead into the wind). If or example you find you are constantly pulling the tiller (i.e. rudder) hard over to pull the model back on course to keep from heading in to the wind your model has weather helm which means your mast and jib must be re-positioned. When tacking if your model stalls into the wind and wont tack? Try different rig setting.

--
Setting Sails
The art of tuning the rig on a sail boat is detailed in books written for racing yachts and boats.

"DINGHY SAILS"
by Jeremy. Howard-Williams

"The Best of Sail Trim:
A Selection of Articles from Sail Magazine"

"Sail Trim: Theory And Practice"
by Peter Hahne

My observations and commentary on tuning are from an amateur and are at best suggestions not professional advice.

Observation Number One!!
Model sails that are single panel loose footed sails rely on the shape of the sail established by the gap between the boom and the foot of the sail. Model sails with "shape" sewn into the sail fabric still are loose footed. Also the lift of the boom also factors in determining the shape and performance of the sails.

Hauling a sail into the center line and at the same time pulling down on the sail can flatten the fabric and kill the sail shape. I like to use travelers to position the sail to the desired point near the center line. Then you can set the point of maximum driving force and not wreck the sail shape.

On a big boat the skipper can changer the suit of sails to match the cut of the sail with the wind conditions. In the case of a model a skipper can change where the out-haul is along the boom, light air adding belly to increase the drive, heavy air pulling the sail out further changing the sails airfoil.

The jib and mainsail work as a system. A skipper has all manner of combinations that may be set relating the two sails. If the models did not have jib clubs they could overlap the mainsail. So model sailors have to adjust the "slot" between the jib and the main to get the maximum driving combined air foil.

In heavy air you may want to close the slot and ease the main so that the jib slightly back-winds the main to help the model sail flatter (less heeling).

Dont forget on a model it is easy to rake the mast fore and aft to trim the sailing characteristics to match wind conditions.
--
A digital camera can be a terrific diagnostic tool for seeing what is happening on your model. You can look at pictures and spot misadjustments. Bends in mast, wrinkles in sails etc. Does you models mast rake forward down wind? Is the back stay bending the top of the mast. How are the jumper/jenny stays adjusted do they balance the tensions between the jib and the back stay?
--
The late Manny Costa of RI always stressed, change one thing at a time to see what changes. He also stressed sailing a pair of models. One model being tuned and sailing against the second to see if the single adjustment improved performance.

Round-Robin racing in pairs is an excellent way to evaluate how your model performs.

Do you find information about Boat Blind Plans are you looking for? If not, below may help you find more information about the Boat Blind Plans. Thank you for visiting, have a great day.
Read more

Boat Plans Bruce Roberts | Americas Cup Value to Sailing

,

Boat Plans Bruce Roberts


I have recently been quite active on the LinkedIn forums about Americas Cup. It is not in my nature to participate in forums because I have found that it is all too easy to get drawn in and become embroiled, fending off attacks by Internet trolls whose great ambition in life is to be destructive to others. LinkedIn is a more closed community and less apt to show this nastiness and aggression. If I feel strongly enough about an issue then I will have my say and keep up with the rest of the discussion.

Just such a discussion came out of my last blog entry, about Race 13 exceeding the time limit. You can read that entry by scrolling down the page or go to the blog archive on the left of this blog. The response was that races should not have time limits and should just continue until there is a winner. It referenced baseball as a comparison. Discussion then progressed to the format that is being used for this current edition of Americas Cup, AC34. Some of my posts have been well received and it was suggested that one post in particular should be read by a wider audience.

I responded to the following question. I dont want to name the poster, I dont have his permission.

"So I am going to go back to my question on the cup. Forty minutes time limit for an Americas Cup race? I would like to see the last race ground out for say 2 hours of excitement vs. just 40 minutes. Are we an ADHD society that if it goes longer that 40 minutes we loose our audiance (sic). I dont care. Its the Americas Cup. It should be raced with sweat and tears to the end. It should go as long as a football game or basketball game(including time outs and media breaks). Shouldnt it?"

Here is my response.

"We all have our own ideas on what should be and what shouldnt be. Whos to say which is right? I agree that 40 minutes does seem too short a time limit but I understand the aim of the organisers to popularise sailing competition with the non-sailors and the parameters within which they were working.

Sailing is its own sport and it is evolving rapidly with technology. Do you really want to watch these two boats sailing back and forth upwind and downwind for 3 hours or more each race and potentially for 17 days (19 days including the 2-race penalty) in a row? That will drive the TV viewers back to whatever they were watching before AC34 came along.

I grow thoroughly bored watching football and baseball. They are stop-start games and they hold the attention of the audience for very short periods of action. The players get to rest for much of the duration and only work in short bursts. They can go on all night if needed, without burning themselves out. The crews on these boats are working hard the whole time, every race.

I think that it will work to compare AC racing with cricket. Test cricket takes 5 days of play, broken into 4 sessions each day. With no limits aside from the 5-day time limit, it often ends with no winner. It bores most people to tears. Then one-day international cricket was introduced, featuring 50 overs (300 balls) bowled by each team against the other batsmen. Suddenly cricket became interesting to a much wider audience. Now they play international 20-over games and the games are very exciting to watch, with massive viewership.

Rugby was always an exciting running game but it has also gone the same route of short, very fast and exciting games with the Rugby Sevens. This is what is needed to hold the attention of the modern world, where there is always something else trying to grab attention. Why should sailing not be right there in the fray also grabbing attention with short, fast and very exciting races.

Sailing is a sport of ageing players and needs new and young blood to survive. This event is likely to attract new people to sailing in one form or another. We can watch yacht racing as we knew it 20 years ago until it goes the way of the dinosaurs or we can embrace the new world and regenerate sailboat racing as a viable sport.

There is still a place for 5-day test cricket, for a much smaller audience than the other forms. Likewise, there is also still a place for the longer duration sailing races. I will be skippering a 38ft sailboat across the South Atlantic in January. We will be racing flat-out for 3 weeks from Africa to South America. There will be exciting times for me and my crew far away from the eyes of any TV audience. I enjoy that racing immensely, as a participant but I dont expect our slow progress across the ocean chart to keep anyone rivetted to the edge of their seat the way that AC34 is doing to us right now.

I think that with AC34 they have hit a winning formula and I am enjoying every short minute of it.
"


Thank you for taking the time to read my viewpoint. It is often a bit off the beaten track but I think that it is valid.

Do you find information about Boat Plans Bruce Roberts are you looking for? If not, below may help you find more information about the Boat Plans Bruce Roberts. Thank you for visiting, have a great day.
Read more

Boat Plans Canada | Didi 950 Build Started

,

Boat Plans Canada


Michael Vermeersch of Ohio commissioned the Didi 950 design and has now started construction of his boat. He is building from a pre-cut plywood kit that was supplied by Chesapeake Light Craft in Annapolis. The kit arrived as 61 sheets of plywood with all components accurately cut by CNC router and packed on 2 pallets.

Michael reports that he is progressing well with the assembly of the backbone and bulkheads and that everything is fitting together beautifully. A few more bulkheads to go, then he will be ready to start setting up on the building stocks.

Michael with wife Pat & daughter Catherine.
Since adding this design to our stock design list, another three boats have been started. They are in Australia, Greece and Latvia.

The Didi 950 is drawn to the Class 950 Rule and detailed for building by the radius chine plywood construction method. It can be built from plans only or from a kit. Kits are currently available in USA but can be supplied by most of our international kit suppliers as well. Enquire with the supplier in your area and I will send the files to them for pricing. Note that for USA you must order from us, you cannot order it directly from Chesapeake Light Craft.

For our full range of designs, please visit http://dixdesign.com/.

Do you find information about Boat Plans Canada are you looking for? If not, below may help you find more information about the Boat Plans Canada. Thank you for visiting, have a great day.
Read more

Selasa, 22 Maret 2016

Plywood Boat Plans Australia | Todays motor home on the water

,

Plywood Boat Plans Australia


I like to sail on boats that I can see and feel the wind. By seeing the wind I can see the ripples on the water, by feeling the winds I can tell when running down wind at night how far the wind has veered by the feel of it against my ears and neck. I also sail to see and enjoy the pure energy of how a vessel moves along by the force of the wind. When entering a Harbour under sail all my senses are on alert to avoid shoals ,other boats and to see a possible wind shift.
So my sailboats are very clean of gear on deck and around the cockpit. At sea I can rig in a second a nice sun awning from the boom gallows to the aft railing supports that were made for this. When its blowing hard I take this awning down and now have a clear view. When going to weather in rough going the wind vane steers the boat and I can just sit in the doghouse and watch the world go by. 
Coming into port in nasty weather I done foul weather gear and just deal with it. At anchor we have a very nice awning setup.

Todays group of sailors think in a different way. These people were raised on tv , computers , video games and commuting by car long distances while talking on the phone and listening to talk show hosts that are bitching about something. These people are used to being in enclosed areas on the way to work, at work and when they get back home. One day they decide to become a sailor - cruiser and start on the computer looking up what they need to live on a boat that will make them feel at home.
This trend has brought us the Island Packet crowd, the huge Room-Ma-Ran catamaran crowd and all the other group of sailors that want to stay under cover till the last instant when one of them has to go forward and lower the anchor. Otherwise they want to stay in what is the equivalent of a sailing motor home. In the typical cockpit of one of these vessels you will have a steering wheel that is over shadowed by a huge GPS system flanked by the VHF and loud hailer . To see around this getup one must stand up on tip toes to see over. Now the compass is in there somewhere but this crowd has the GPS full map system so who needs to look at that , all i need is my waypoint book .
Sailing under a fully enclosed Florida Room like you see on the intra costal where they enclose half the property and pool area under a huge screen cage . Side flaps down , the little window to maybe look up at the set of the mainsail but who does that and the sun might find me so its closed.
What the whole sailing experience comes down to is seeing the goose neck of the main boon and maybe the genoa tack at the bow.
Sensory deprivation at its best. But hey the sun cant find you under  all this crap.
At night with the GPS TV show going on all night vision is gone . But the good this is theyre in the safety compound of the FLORIDA ROOM.

Id rather experience the sea that I sail on. 


Todays floating CARAVAN-MOTORHOME at rest . They have missed the channel completely . The wind is in the east coming from their stern . They have set the anchor to leeward in the channel they should have been in. Three more of their tribe are consoling and trying to figure out what to do. 
In passing by in our dinghy going home I suggested to put a kedge out to windward and put a strain on it so when the tide floats them they will be heading into the wind and not drifting into the channel and onto the leeward rocks. They got off fine.

But iam sure they missed the channel because they were not looking at it but at their GPS TV show
Enclosed in the saftey of the FLORIDA  ROOM.


Do you find information about Plywood Boat Plans Australia are you looking for? If not, below may help you find more information about the Plywood Boat Plans Australia. Thank you for visiting, have a great day.
Read more

Kayak Boat Plans | Didi 950 Hulls Taking Shape

,

Kayak Boat Plans


The Didi 950 projects of Fred Grimminck in Australia and Mike Vermeersch in USA continue in parallel. Freds build is from plans only and Mikes is from a kit that was cut by CNC router. Both have completed the flat sheet panels of the sides and bottom and are now skinning the radiused parts of their hulls. This is the stage that the hull shape really starts to show.

Some of the photos that I show of these two projects show minor differences, due to building from a pre-cut kit or with the builder cutting all components. Both produce the same boat at the end of the process but they may look a little different at times while being built.

Side and bottom panels all completed, ready for radius to start.
The photo above is of Mikes kit boat, with neat edges at the sheer (where hull and deck will meet). The photo below is of Freds boat with irregular edges at the sheer. This is because the kit panels are supplied with a uniform strip of waste to be trimmed off to the final line after turning the hull over, while the boat built without a kit has the panels inividually cut by the builder and the waste width may vary.
Same stage, Freds boat. Backbone still to be trimmed at forefoot.
The radius is skinned in two layers, made with narrow transverse strips. The first layer lies on the stringers and the doublers of the tangent stringers, fitted between the edges of the side and bottom panels. These edges have rebates pre-cut into them and onto which the second layer will be laid.
First layer of radius being fitted to Mikes boat.
The rebate along the edge of the side panel can be seen in this photo.
Final hull shape starting to become clear.
Construction of the boat in Latvia has now started and the boat in Greece will soon follow. To see more of this design and others in our stock design range, please visit http://dixdesign.com.

Do you find information about Kayak Boat Plans are you looking for? If not, below may help you find more information about the Kayak Boat Plans. Thank you for visiting, have a great day.
Read more

Wooden Boat Plans And Kits | Ships log

,

Wooden Boat Plans And Kits


Boat position: N38* 57 46.03"  W84* 14 45.13"

Nautical miles traveled: .0006583

Engine hours: 0

Captains state of mind: Hmm?

Whats this all about you ask? The reason there is a small percentage of nautical miles traveled is because the boat moved. The reason the boat moved is because its sitting on the axles that will move her to THE LAUNCH SITE. The reason I moved the boat is because I could.

The move of the boat represented about two feet forward, then two feet back. It was a pretty easy thing to with a little nudge from my skid loader providing the power.

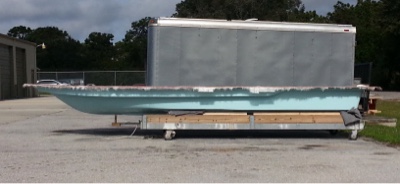
Getting the boat on the axles was a pretty straight forward job that consumed some hours. The first thing I did was reinforce the bow section of the building cradle. Since the aft section of the boat was getting lifted the highest, I decided to jack up this end first, and then do the bow. I was afraid the lifting cradle on the bow would not handle the shifting, forward push of the load, so I added some bracing to the cradle. The next step was to build cribbing using concrete blocks on the port and starboard side of the boat to catch it if something bad happened. I knew it would not twist off of the jack since it was supported by the bow cradle, but if the bow cradle failed, and it dropped down on to the cribbing I had under the bow, it could roll off of the jack, hence the cribbing on the sides.  I used a 30 ton bottle jack under the keel and a frame member to jack the boat up. I also placed cribbing along side the jack in case the jack failed.

The boat  went up off of the jack stands smoothly, and without any hiccups.  I was pretty pumped to see it separate from the building cradle, and slow was the speed I chose to operate at. I would lift if a couple inches, then stop and take a walk around to see how it was behaving on the bow building cradle. Once it was high enough, I would add some wood blocks to the temporary side cribbing to keep the distance to the hull close, then lift it some more. I guess it took about an hour and a half to lift it the 14" I needed to get the axle under the keel. Most of the time was me checking things out and going outside the barn to chain saw more wood blocking as she got higher.

Being able to jack this boat up from one point gives some testament to how stout shes built.  

I had the axle under the boat before I started to lift her, so once she was high enough, I rolled the axle to the final position the squared the axle to the hull. Since I still had the cradle strong back in place, and since the hull was built square to the strong back, I just measured off of the strong back and positioned the axle off of that. Because the rear axle is so wide, the cradle strong back prevented me from  putting two of the four wheels on the axle while the strong back was in place. Once the axle was in position, I torch cut some of the strong back away, and put the two outer wheels on the axles. With all four wheels on the axle, I lowered the hull on to axle. I was amazed at how much the axle started to deflect, but due to me reinforcing the tube, the deflection was minimal. Once the load was fully on the axle, I lightened the load a bit and fabricated the stanchions that will prevent the boat from tipping off the axle. To pad the hull from the stanchions, I cut up pieces of rubber mud flaps and put them between the hull and the stanchion pads. Once the stanchions were in place, I lowered the hull on the axle and moved my operation forward.

Placing the hull down on the forward axle was much easier and went pretty quick. I just had to jack the hull off of the forward cradle, cut the cradle and strong back away, then roll the steering axle in place. I took a few measurements, and made sure the steering axle was parallel to the rear axle, placed some two inch blocks on the I beam cross members I had made for the steering axle, and lowered the hull on to the steering axle. The only hiccup I had doing this was when I was putting the hull on blocks so I could move the jack, two of the concrete blocks broke, and I had to replace them. The loud popping of the block made me jump a bit, but it worked out OK. As I placed the full load of the hull on to the steering axle, I quickly realized the tires are not beefy enough. If I tried to haul the boat with those tires and as much as the tires have bulged, the tires would quickly heat up and blow out. A blow out would be sure to happen even at the slow speed Im going to be traveling at. I kept more of the load on the keel blocks, and a call to my tire guy assured me I could replace the 10 ply tire with some larger 24 ply tires that would make the trip. Ill deal with replacing the tires in a week or so.

The hull is now about 18" out of level so very little work will be done up there until she gets to THE LAUNCH SITE. There are a few little jobs I need to get finished before I haul her out of her nice cozy barn, but my main focus will be  getting the super structure ready to install. Now that shes on the axles, I measured her down the road height at 14 5". This height is lower than I had originally thought it would be, and thats a good thing as wires should be of little issue. I will clear the highway overpass by more than a foot and a half, so for right now all is good.

Now that the hull is on the axles, and I have the cradle removed from the shop, I am moving on with getting the super structure put together. The panels are already built, and now that I have the cradle steel available to me, Ill put together a gantry and get on with some more building. The building part of this type of project is fun, with all the devil in the details. Im not going to make any promises, but this next part of the build should go pretty fast.

Cheers,


Do you find information about Wooden Boat Plans And Kits are you looking for? If not, below may help you find more information about the Wooden Boat Plans And Kits. Thank you for visiting, have a great day.
Read more

Jumat, 18 Maret 2016

Boat Plans And Patterns | Star 45 Setting Sail on line How To Sail resources

,

Boat Plans And Patterns


From: "Don Keeney" <1keyknee@281.com>
Date: Sun, 19 Nov 2006 15:39:26 -0600
Subject: [Star45] Sail Trim

A great place to learn about sail trim and sailing in general.
http://www.sailingusa.info/sail_trim.htm

Don Keeney
Star 45 Class Secretary
--
Outstanding recommendation. Wonderful site. full of photographs and all sorts of instructional materials. Pictures of tells and how to read them:)

Another must place to visit (you can try out your sailing skills):
National Geographics Interactive Sailing:

Master rudder and sail to get your boat going as fast as possible no matter what direction youre sailing in-or which way the winds blowing.

Controls available:

Sail Adjuster: Use the left sliding controller to rotate the sail in relation to shifting wind (shown as arrows). When you cross the path of the wind, your sail will swing to the opposite side.

Rudder Adjuster: Using the right sliding controller, steer to port (left) or starboard (right).


Uncle Dave

Do you find information about Boat Plans And Patterns are you looking for? If not, below may help you find more information about the Boat Plans And Patterns. Thank you for visiting, have a great day.
Read more

Boat Plans Wooden | Shallow water skiff shapes ideas

,

Boat Plans Wooden


Here are some of my old musings of developing skiff shapes to bring to reality. As I described earlier in my blog of how I like to make a half hull of my vision - idea . I do this after I have done all my weight calculations in advance. Shown are a few past ideas in their growth stages. Sorry but I would love to be able to do this all properly but all I have is the iPad that I got for Christmas this year from my daughters. With out this contraption I probably would not take the time to do all this. Right now it is flat calm with lots of light rain about so Im inside with a fan on doing something. The iPad is great as I can do this stuff with a simple inverter on our sailboat as we move about and post it later. No TV time in my life so have extra time to fiddle here.

So look at the wood half hull against the mirror. The sections are glued to a 1/4" piece of wood,without this it would sit flush against the mirror with the thickness of the mirror being the center line. This is how it was done before 3 D programs . It does make you feel like a peeping Tom though as you stretch around trying to see the whole thing. Each section is drawn out from the center line to scale. Here you can calculate how many cubic inches are in each section. I do not have the side views showing which would tell and show you the distance between each section. It would not show up here very well.
What I will do this summer is draw up 3-4 new skiff shapes from past knowledge with all dimensions easy to draw up to full size hull sections. These you will be able to cut out and install on a simple building jig and from there you will be able to plank up in light cedar strips, Baltec balsa core strips or Core Cell brand planking strips. From this you fair and then glass the outside. When fair, flip over,
remove the forms and glass the insides. Then you finish the inside. To build a deck I will explain all the ways it can be done simply later. I will put this here for free. In the mean time anyone planning on building a skiff needs to read up a bit on strip plank boat building. This is the same as building a canoe; just a little more odd shape and it has a transom. I will get a list of books or pamphlets to look up.
In looking at these shapes it is easy to start to see how many ways and directions you could now reshape and go. Ha, it can be daunting if you do not have a weight list and a clue as to what the finished hull will weigh. Here I come back to having the vision, idea, whatever. Details. 

Of course if you are going to start a new company and you want to follow in the foot steps of something that is already well proven and established then all you really have to do is make a facsimile of it as all the thinking has already been done for you. If you do make it better, and at a better price good for you. 

Now with all the shapes here you still have to decide on which side of the half section line you will put your hull thickness. Makes a difference . Take your numbers from the center line out wards and up to the LWL. This is the quickest way. This method shown here has been used for centuries with the creations of some of the most beautiful boats in the world. Go to see the Herreshoff museum in New port RI. He did all his boats this way. There is not a Yankee boat builder up north that does not know this system nor a Carolina one either. The computer today is the way to go though if you have one.


  Another idea; this shows how you can take an existing boat today and measure or take its lines sections. Without knowing its length between perpendiculars you could stretch this boat out to ......

In this shape here I wanted a good sea boat at rest that would not be as they say here too "cranky" .
It has good freeboard and was a good all round skiff. I lowered the spray rail on this a bit in the bow area when built. Today I would change the stern section aft so this is obsolete in my mind.
 You can see the half sections above and the half hull below. 


Cheap 3 - D rendering 


You can see here how Im drawing in a bit of crown. I like crown a lot. It adds tremendous strength over a flat surface. Also you can gain some Disp. But then you have to be careful where its going to direct the water flow. I do not want crown in my skiff decks as it is a pain in the butt to fit the hatches so the will not squeak and lay flush. 


On this sheet you can see the displacement calculation that I wrote down from a simple lines program that I found on the Internet at the time. I put in all my half section numbers and in a second it spit out all these numbers. I had already done it my old way and every thing was pretty close. In the upper left corner you can see the displacement numbers for three different water lines. This you have to think about a lot as the guys, people that will be in the boat, are most likely going to weigh over 200 lbs.
The rest of the numbers there are just adding up Disp. If I posted all my calculation sheets it would be so boring. But I keep em for reference. This is a heavy skiff at close to 2,000 lbs with all the sports in it.


Do you find information about Boat Plans Wooden are you looking for? If not, below may help you find more information about the Boat Plans Wooden. Thank you for visiting, have a great day.
Read more

Boat Plans Nz | Thomass Hayes new Flats skiff build

,

Boat Plans Nz


Thomas Hayes is a fourth generation boat builder from Florida. He has been working in the Fiberglass production boat building business for 18 years working in all phases of the fiberglass production of boats as a hands on builder to supervisor. He knows his trade very well. 
I have had the pleasure of corresponding with him over this past year answering questions and giving my opinions and some advice on his personal project. 
He started out just wanting to design and build his own skiff for himself and then two more for family. This project has grown from just a hull mold to now a finished complete skiff with all molds ready for production of many more.
Following are some pictures Thomas has been sending me of his skiff in progress.
He has not launched his skiff as I write this blog but it will soon be in the water.
Lots of new ideas being used here in his skiff. Look closely... As I feel lots of these ideas will be finding their way to Others new designs.


Heres his unnamed new skiff just pulled from the mold. For the underbody pictures go back and look at my old blogs about new skiffs. This looks to be the driest running skiff out there. Cant wait to see her running.


Huge bow spray rail and lots of underwater spray defectors.


Look at that bow over hang. This skiff will weigh around 600-700 lbs when finished. Its a nice big skiff.


Heres the deck with all the hatches installed. No hinges on deck!!! All his hinges are hidden with his unique hinge system. Its very simple when seen.


 Bow hatch finished.


Bow hatch details revealed. How cool is this?


His moldings are as good as they get.


His deck mold has no hatches molded into it. This means that he can move his separate hatch molds where ever he or the clients want them. Look next to see how this works.


Because of his perfect moldings he just puts the finished part on the deck mold. He then gelcoats the deck around this part and when it cures this part is then glassed in as part of the deck. When its all pulled out of the mold all he has to do is just trim and slightly buff in the transition edge of these two parts. To me this is brilliant. Saves having to make so many deck molds. Now you can have more shop space.


All hatch tooling parts in place here ready for the deck gelcoat and then glass work.


Now the deck is attached. The clear glass in the bulkhead is the side of the fish live well or bait well depending on what youre up to. This detail he saw in an old Cabo Boat and has carried it into his skiff.


Wont that be fun to look at when its full of bait night fishing? The black ring is the drain.


The not so fun side if youre the bait or the fish caught looking out into the cockpit. Look at the details and finish throughout. Top of the line. 


Skiff going together.


Console being finished. Now look.


Console details. Look at what goes here.

Removable cooler box. 

Thomas says he has been influenced by early Hells Bay and Gordon Skiffs having owned an 18 Waterman and a Glades skiff. 
He has put lots of effort and money into this project that has taken him a year of part time work. At present he says he has almost the same amount of $ in his first finished skiff here and all molds as a new store bought skiff bare hull. 
But he now has the molds to build the next two that his family members want and then he will have to see if he wants to get in the market to build more for others.
Wait and see how this skiff performs. It might be the next " ONE" for you.
Thomas will always be able to say " Yes its my own design and build" with pride.
Theres nothing like being in a boat you built yourself.
Well done Thomas and good building to you a master craftsman.


Do you find information about Boat Plans Nz are you looking for? If not, below may help you find more information about the Boat Plans Nz. Thank you for visiting, have a great day.
Read more
 

Boat Plans For A Chesapeake Deadrise Copyright © 2016 -- Powered by Blogger